Table of Contents
This is an old revision of the document!

EVO: Engine Mechanical
Engine Mounts
General Information
Sub Documents
Torque Specs
The 1986-1990 FSM lists no torque specs for the rear mounts or lower front mounts.
There is only one spec in the 79-85 FSM (rear motor mounting bolt-nut: 16 to 24 ft lbs) and the 86-90 rear mount is the same part from 84-90.
For the rest, there are general “Torque Value” charts in the front of the service manual. 1)
It lists general torque values for bolt types but not specific mounting bolts.
It also says to torque to these values given in the tables unless specified otherwise. There are two charts (English and Metric).
Below is a list of torque values from the different year model FSMs.
 |
|||||
|---|---|---|---|---|---|
| Torque Specs in HD Service Manuals | |||||
| 1986-1990 Engines | |||||
| Upper Front Mount to Head | 25-30 ft-lbs 2) | 34-40 Nm | Upper Front Mount to Frame | 30-35 ft-lbs 3) | 40-47 Nm |
| Top Front Mount to Heads | 25-30 ft-lbs 4) | 34-40 Nm | Top Front Mount to Frame | 30-35 ft-lbs 5) | 40-47 Nm |
The charts below are from the torque value charts in the 86-90 FSM.
 6)
6)
|
|||||||
|---|---|---|---|---|---|---|---|
| SAE Torque Value Chart per Bolt Type | |||||||
| Bolt size | SAE 2 74,000 psi Low carbon | SAE 5 120,000 psi Medium carbon heat treat | SAE 7 133,000 psi Medium carbon alloy | SAE 8 150,000 psi Medium carbon alloy | Socket head cap screw 160,000 psi High carbon quenched tempered | Socket head set screw 212,000 psi High carbon quenched tempered | Studs |
| #6 | - | - | - | - | - | 9 in/lb | Use SAE 2,5 and 8 values when grade is known with nut and sufficient strength |
| #8 | - | 14 in/lb | - | - | - | 16 in/lb | |
| #10 | - | 22 in/lb | - | - | - | 30 in/lb | |
| 1/4“ | 6 ft/lb | 10 ft/lb | 13 ft/lb | 14 ft/lb | 16 ft/lb | 70 in/lb | |
| 5/16” | 12 ft/lb | 19 ft/lb | 25 ft/lb | 29 ft/lb | 33 ft/lb | 140 in/lb | |
| 3/8“ | 20 ft/lb | 33 ft/lb | 44 ft/lb | 47 ft/lb | 54 ft/lb | 18 ft/lb | |
| 7/16” | 32 ft/lb | 54 ft/lb | 71 ft/lb | 78 ft/lb | 84 ft/lb | 29 ft/lb | |
| 1/2“ | 47 ft/lb | 78 ft/lb | 110 ft/lb | 119 ft/lb | 125 ft/lb | 43 ft/lb | |
| 9/16” | 69 ft/lb | 114 ft/lb | 154 ft/lb | 169 ft/lb | 180 ft/lb | 63 ft/lb | |
| 5/8“ | 96 ft/lb | 154 ft/lb | 215 ft/lb | 230 ft/lb | 250 ft/lb | 100 ft/lb | |
| 3/4” | 155 ft/lb | 257 ft/lb | 360 ft/lb | 380 ft/lb | 400 ft/lb | 146 ft/lb | |
| 7/8“ | 206 ft/lb | 382 ft/lb | 570 ft/lb | 600 ft/lb | 640 ft/lb | - | |
| 1” | 310 ft/lb | 587 ft/lb | 840 ft/lb | 700 ft/lb | 970 ft/lb | - | |
Parts Lists
 |
||
|---|---|---|
| 1982-2003 Rear Motor Mount | ||
| Part# | Year model | Notes |
| 16203-82A | 82-90 All | Appearance- offset, billet aluminum. Replacement for 16203-82 for 82-83 models. |
| XXXXX-XX | 1991-2003 | Rear motor mounts are steel, welded to and are a part of the frame. |
| 2004-Up Rear Isolators | ||
| 48492-04 | 2004-up | (L and R) Rear rubber isolators. |
| 16291-04 | (L) Rear isolator mount (right isolator fits into the frame). | |
| 2004-up Rear Stabilizer | ||
| 16232-04 | 2004-up | Lower Rear Tie Link (motor to frame) |
|
||
|---|---|---|
| L1984-2003 Front Lower Motor Mounts | ||
| Sportster year model | Lower front mount (R) | Lower front mount (L) |
| L1984-1990 | 16210-84 (black) | 16212-84 (black) |
| 2004-Up Front Stabilizer Tie Links | ||
| 47471-04 | 2004-up | Upper Front Tie Link Mounting Bracket (attached to engine) |
| 47470-04 | Upper Front Tie Link Bracket (attached to frame) | |
| 16232-04 | Upper Front Tie Link (bracket to bracket) | |
| 47470-04 | Lower Front Tie Link Bracket (attached to frame) | |
| 16232-04 | Lower Front Tie Link (bracket to motor) | |
| 2004-Up Front Isolators | ||
| 48463-04 | 2004-up | (L and R) Front Rubber Isolator |
| 16287-04 | (L) Front Isolator Mount (right isolator fits into the frame). | |
1986-2003 Motor Mounts
Rear Mounts
1982-1990 mounts offset the engine 13/32“ to the left of the position for pre 1982 engines and don't have the hole in them for the kicker shaft to go through. 7)
1984-1990 Rear Mount:
This mount is made from billet aluminum and was also sold as a replacement for the 82-83 rear motor mount.


Lower Front Mounts
| L1984-2003 style lower front motor mounts. 14) | |
 |  |
Top Mounts


2004-Up Motor Mounts
Sub Documents
Isolator Mounts:
There shouldn't be that much vibration on rubbermount bikes. You should feel some but not enough to make your feet numb. 17)
Keeping the motor mounts in specs makes all the difference in the world. 18)
Tip: If your mirrors are blurry, check your motor mounts. You also may notice the engine bouncing around and the handling loose. 19)
The rubber mounts do in fact allow the engine and swing arm to move all around. 20)
The job of the rubber mounts (or isolators) is to simply carry the weight of the engine, not to align it.
However, there are 3 stabilizer links from the frame to the engine that eliminate side to side movement of the engine.
The most obvious stabilizer link is in front of the front cylinder head.
The end result is the engine can move vertically, but not horizontally.
This system was designed by Eric Buell to reduce engine vibration to make the V Twins less prone to vibration bothering the rider.
Next time you start the engine, watch the swing arm pivot bolts, they move up and down with the engine vibration.
Now look at the tire contact patch on the ground, it barely moves at all.
An over tightened drive belt can cause the engine to be jerked backwards by the swing arm when going over bumps in the road.
If you take the shocks off, you can feel an over tightened belt bind up the suspension travel when either the rear axle is in line with a line drawn through the swing arm pivot bolts and center of the front pulley in the case of longer shocks, or at max shock extension in the case of shorter shocks.
If the stabilizer links and rubber mount bolts are tight, it is possible the problem is a loose fit between the swing arm pivot shaft (which goes through the rear mounting lug on the engine), and the rear mounting lug on the engine.
It is possible the torque of the belt can cause the rear wheel to turn out of alignment, but again, the real problem may be the fit between the swing arm pivot shaft and the rear engine mount lug.
Better tires and fork brace are also part of the problem.
It could also be loose steering head bearings, bad wheel bearings, loose wheel spokes and a lot of other stuff.
All this, and more, is covered in the 7 pages of Suspension in the REF section of the Sportsterpedia and the famous 'Wobble" thread from the XLForum.
Stabilizer Tie Links:
The 3 stabilizer links on the engine and the pivot shaft through the rear engine mount are the components that keep the alignment between front and rear. 21)
They are supposed to eliminate side to side movement of the motor.
They do however allow vertical movement of the motor and front of the swing arm in response to vibration. 22)
The rubber mounts also allow for vertical movement to absorb vibration, this is also normal.
This is how the motor's vibration is isolated from the frame. You can see this when the motor is idling.
The motor is moving, the swing arm pivot bolts are moving.
But by the time the vibration gets to the rear wheel, it is not changing the contact patch of the rear tire on the ground. Well, not much anyway.
An over tightened drive belt will cause the engine to be jerked backwards as the rear wheel goes over bumps in the road.
This is not normal. If you take off the shocks and loosen the belt so it does not bind the rear suspension, the engine and swing arm will not jerk backwards.
If the rear wheel contact patch moves forward and back while riding, the effect on handling will be barely noticeable at street legal speeds. Normal swing arm up and down movement in response to bumps in the road moves the rear tire contact patch forward and back as the wheel swings on the arc set by the swing arm. This is normal. The rubber mounts and stabilizer links do allow this front to rear movement.
However, if the rear wheel contact patch moves side to side, or if the tire tilts side to side, or the tire is allowed to twist like a steering wheel of a car, handling will immediately be effected for the worse and the rider will lose control very quickly. 23) You cannot have the tire moving side to side. The rear tire must stay in line with the front to rear axis and centerline of the bike. Lateral play or side to side play, is when the rear tire turns away from the centerline. In effect, this becomes rear steer, and that does not work on a motorcycle.
There is metal to metal contact, with no lateral or side to side play between the rear tire and axle, swing arm, pivot shaft, rear engine/transmission mount, and 3 stabilizer links to the frame. There should be no lateral or side to side play in any of these connections. These metal to metal connections are much stronger and have much less flex than the rubber mounts. These metal to metal connections are keeping everything in line, not the rubber mounts.
Rear Mounts
| Swingarm tightened without rubbers. 24) | Left and right bushings installed shows space between them and the brackets. 25) | |
 |  |  |
Rear Stabilizer Mount


Lower Front Mounts
Top Stabilizer Mounts
Check the top isolator link mount bolts (the ones that bolt to top of the front head). 28)
(While you're there, check them all). If they come loose, add some blue Loctite to the threads and re-torque them.
| Front Stabilizer Assemblies. 29) | ||
 |  | 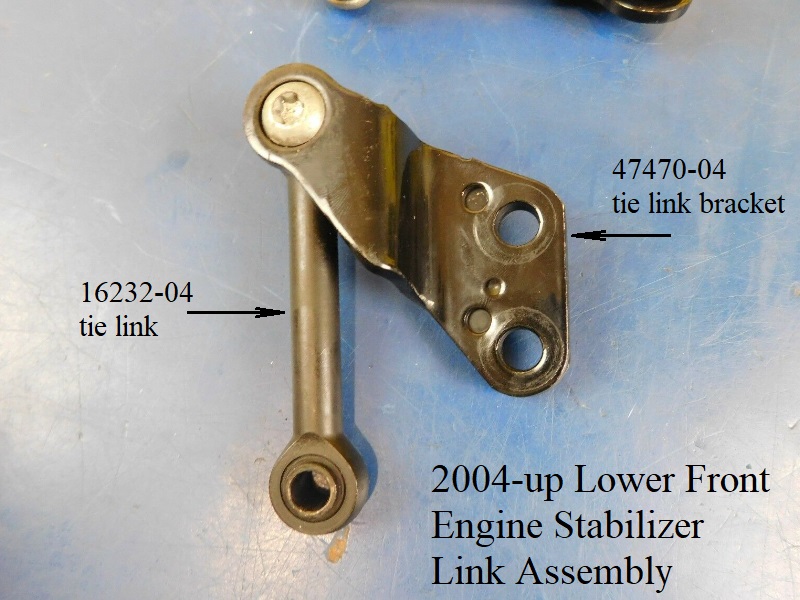 |

