This is an old revision of the document!

REF: Engine Mechanicals - Sub-01M
Cam / Gearcase Cover Mods
See also Pics of Cam / Gearcase Cover Mods.
Some Tools and Suggestions
Design:
You can sketch out a design and lay it up on the bike as it would be installed.
That way, you get to see it before cutting it which may cut down on costs of another one after the fact. 1)
 |
Oil Passages:
Check the oil passages around the bushings before you start cutting on the cover.
Some have a factory drilled oil passage (1/8“) through the cover going to the pinion bushing area. The hole on the lower edge of the cam cover was then welded to seal this hole. 2)
After cutting thru this hole, it can be plugged again by running a 1/4”x20 tap in and threading a screw into it with JB weld / epoxy applied. 3)
 |  |
Dowel Pins:
It's also important to keep the dowel pin holes intact. With dowels front and rear,
It ensures the accurate alignment of the bearings / bushings in use. 4)
It also ensures correct alignment of the cam cover if or when you have to line ream replacement cam bushings. 5)
Cutting the cover while installed:
While it is possible to cut the cover down while it is installed on the engine, it's safer to remove it.
When removed, the cutting can be done more easily and the finish more smoothly.
When installed, the issue is more avoiding the oil lines and oil pump,
Especially the return line that already gets worn thin by rubbing the back side of the cover.
It would also be very difficult to see what you are doing there on the top back side (near the pulley). 6)
Get everything out of the way.
Tape off the area to be cut.
Use a muffler cutter air tool (or other) to remove most of the material.
Then work it with a file to the desired shape.
Always take off less than more. You can keep cutting, but if you go to far you can't put it back.
It's time consuming and harder to do than having the cover off. 7)
It's probably easier to take it off then to try to do it still on the engine.
To remove the cam cover:
The lower rocker box has to come off the head (properly) enough to relieve tension on the pushrods / valves / lifters / cams. 8)
Just be careful sliding the cover off. Make sure you come straight out slowly, and look inside the case with a flashlight.
When you get it cracked open, make sure you're not pulling the cams out. 9)
For Cutting the Cover
- Saws-all.
- Angle grinder with a metal cutting blade.
- Hacksaw.
- Jigsaw.
- A Dremil rotary tool can be used but the metal cutting blade is too small to cut at 90° angles.
The O.D. of the body is wider than the cutting bit.
(You'll end up making angled cuts instead of straight ones (good if that is intended).
- A mechanical or CNC mill is very helpful for precise and non-jagged cuts.
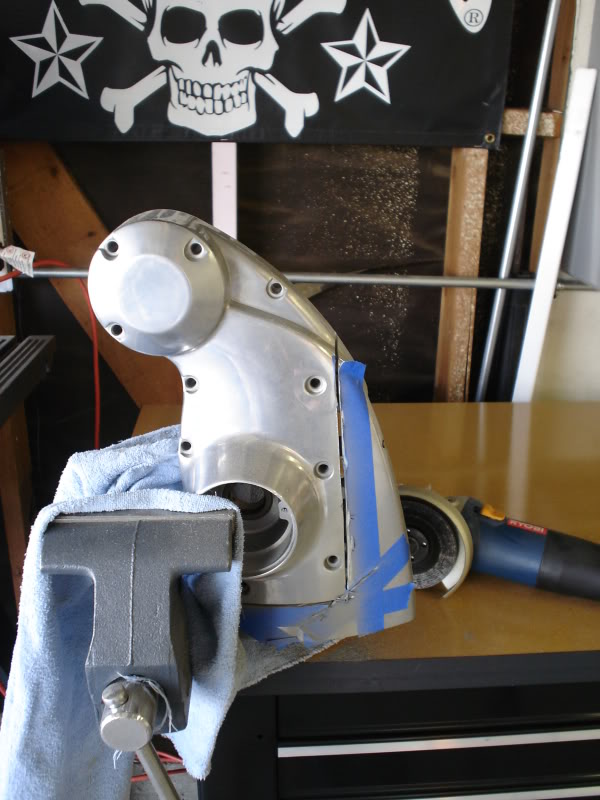
| Cutting area marked out with tape. Cuts made with an angle grinder with the metal cut-off blade. 10) |
|
 |  |
| Cover bolted to a sheet of steel as a jig to hold the cover in a vise for machining the excess off with a milling machine 11) | ||
 |  |  |
To Protect the Aluminum from Scratches While Cutting
- Painters tape.
- Soft jaws in a bench vise.
- A towel to wrap the cover in before chucking into a bench vise.
For Holding the Cover While Cutting
- Bench vice.
For Shaping and Smoothing
- Angle grinder.
- Bench grinder.
- Belt sander.
- Hand files.
Try a belt sander first and then finish with a palm sander. 12)
| Basic shaping done with the sander and files. (this can take several hours) 13) | ||
 |  |  |
For Finishing
- Wet dry 220/400.
- Steel wool.
- WD-40.
- Aluminum polish.
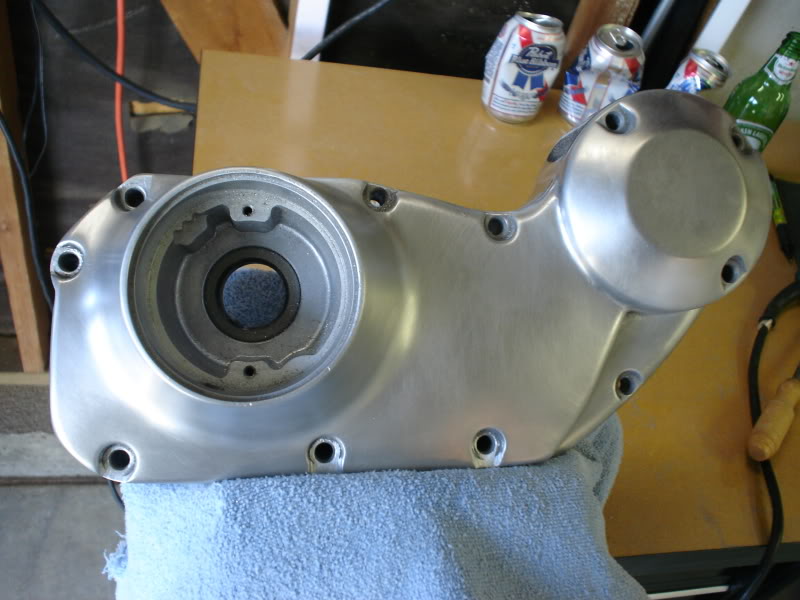
| The mounting holes were notched near the cut areas to make them all symmetric. The surface was finished with steel wool/WD-40 and aluminum polish 14) |
||
 |  |  |